
| 일 | 월 | 화 | 수 | 목 | 금 | 토 |
|---|---|---|---|---|---|---|
| 1 | ||||||
| 2 | 3 | 4 | 5 | 6 | 7 | 8 |
| 9 | 10 | 11 | 12 | 13 | 14 | 15 |
| 16 | 17 | 18 | 19 | 20 | 21 | 22 |
| 23 | 24 | 25 | 26 | 27 | 28 |
- Hooks
- Flex Box 기본
- 객체지향프로그래밍
- Eclipse
- SQL 연산자
- 환경설정
- REACT
- SQL 명령어
- 스프링
- java spring
- 리액트
- 자바 스프링
- HTML5
- SQL 문제
- 관계형데이터베이스
- 타입
- SQL
- java설치
- 이클립스
- 노마드코더
- ubuntu
- 플랙스박스기본
- spring
- 오산대맛집
- spring 환경설정
- 람다식
- 자바스프링
- Flexbox Froggy
- numpy
- node.js
- Today
- Total
이것저것
[calendar] react-big-calendar (json) 본문
How to Handle Input Value Changes in React
A special feature of React is that you have to handle input value changes yourself. Otherwise, users cannot see what they entered as the value is not set in the state.
To update the input value and set it in the state of our component, first we have to add:
React의 특별한 기능은 입력 값 변경을 직접 처리해야한다는 것입니다. 그렇지 않으면 값이 상태에서 설정되지 았으므로 사용자가 입력 한 내용을 볼 수 없습니다. 입력 값을 업데이트하고 컴포넌트 상태로 설정하려면 먼저 다음을 추가해야합니다.
const [title, setTitle] = React.useState("");
to create the function setTitle to set the value of title .
Then we have added a handler function to get the value from the input and set it:
함수 setTitle을 생성하여 제목 값을 설정하십시오.
그런 다음 입력에서 값을 가져와 설정하기 위해 핸들러 함수를 추가했다.
const handleTitleChange = ev => setTitle(ev.target.value);
ev.target.value has the input’s value.
Then when we add the input, we have to add it like this:
ev.target.value는 입력 값을 가진다.
그러면 입력을 추가할 때 이렇게 추가해야죠.
<input
 type="text"
 name="title"
 placeholder="Title"
 value={title || ""}
 onChange={handleTitleChange}
 isInvalid={!title}
/>
We pass in the handleTitleChange function to the onChange prop so that title will be set. Then once it’s set then value prop will be populated and users will be able to see the value they entered.
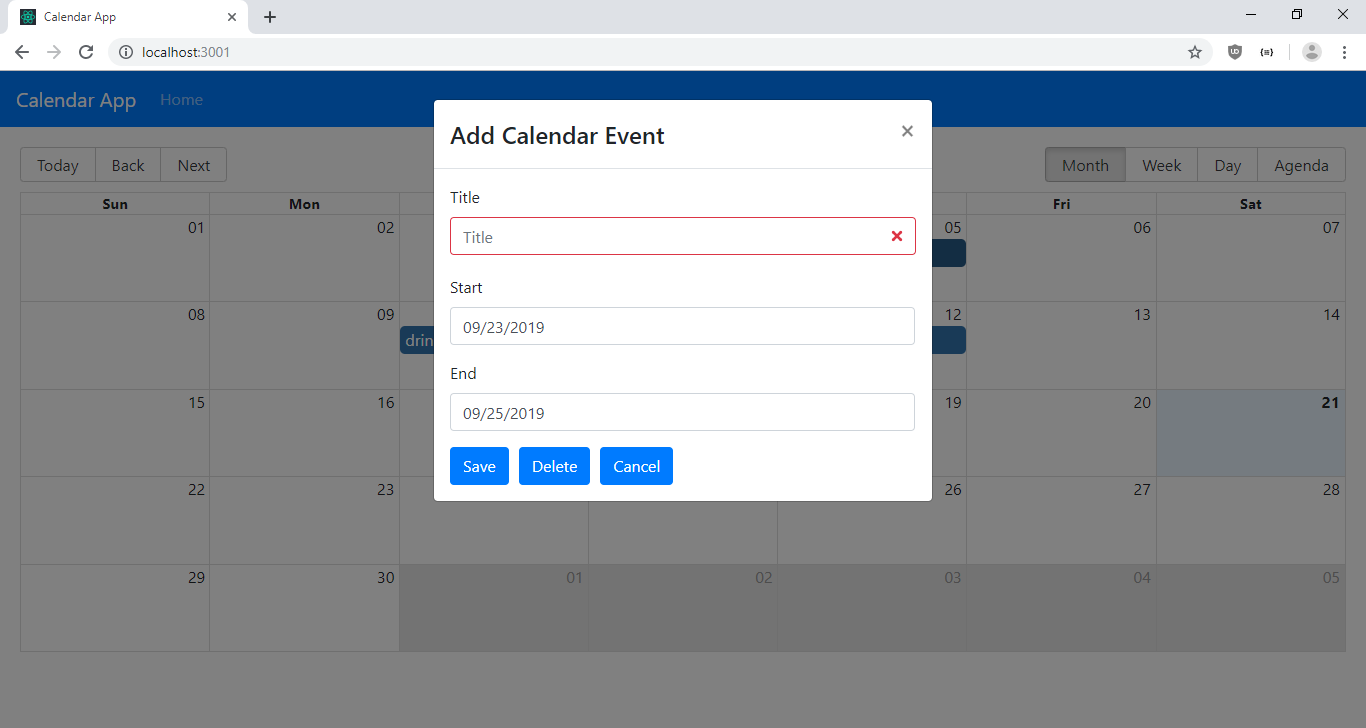
In this article, we will make a simple calendar app where users can drag over a date range and add a calendar entry. Users can also click on an existing calendar entry and edit the entry. Existing entries can also be deleted. The form for adding and editing the calendar entry will have a date and time pickers to select the date and time.
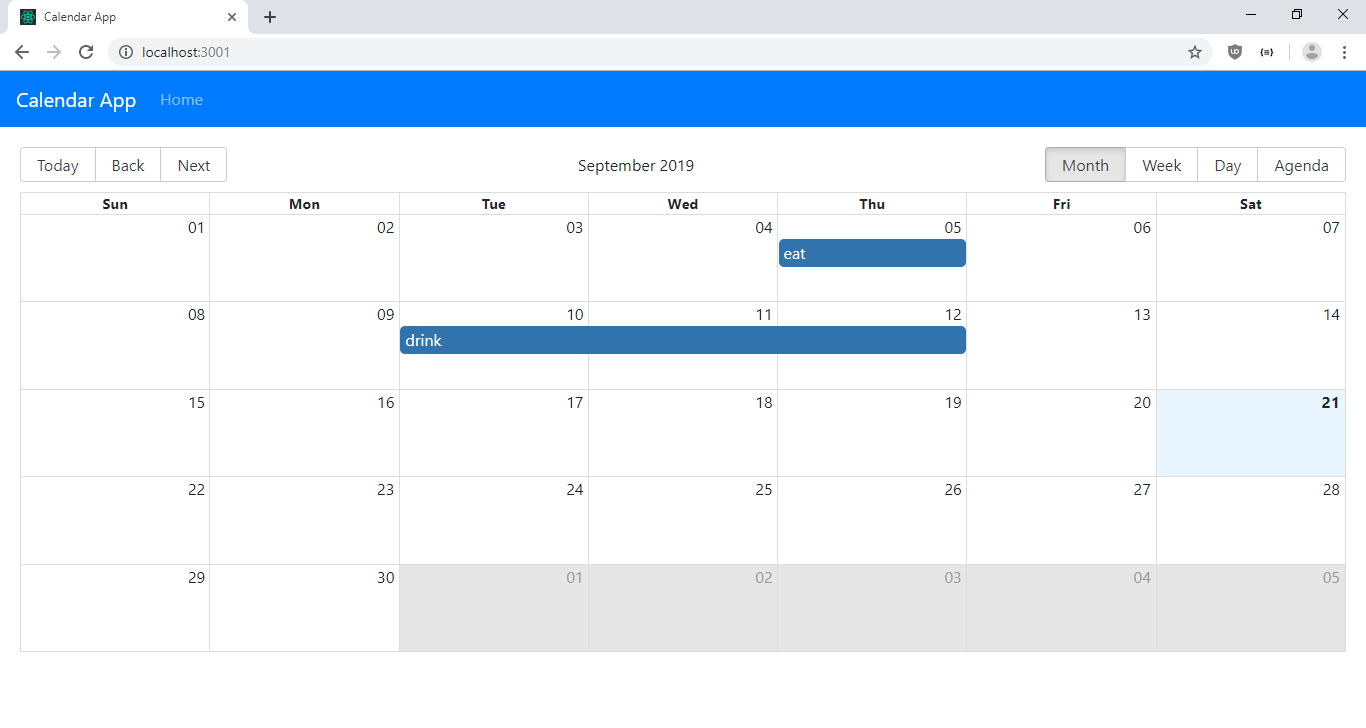
React has many calendar widgets that we can add to our apps. One of them is React Big Calendar. It has a lot of features. It has a month, week, and daily calendar. Also, you can navigate easily to today or any other days with back and next buttons. You can also drag over a date range in the calendar to select the date range. With that, you can do any manipulation you want with the dates.
We will save the data on the back end in a JSON file.
We will use React to build our app. To start, we run:
제목이 설정되도록 handleTitleChange 기능을 onChange 받침대에 전달한다. 그러면 일단 그것이 설정되면 가치 소모가 채워지고 사용자들은 그들이 입력한 가치를 볼 수 있을 것이다.
이 글에서는 사용자가 날짜 범위를 끌어다 달력 항목을 추가할 수 있는 간단한 달력 앱을 만들 것이다. 사용자는 또한 기존 일정관리 항목을 누르고 항목을 편집할 수 있다. 기존 항목도 삭제할 수 있다. 일정관리 항목을 추가 및 편집하는 양식에는 날짜와 시간을 선택할 수 있는 날짜와 시간 선택기가 있다.
리액션은 앱에 추가할 수 있는 많은 캘린더 위젯이 있다. 그 중 하나가 '큰 달력 반응'이다. 그것은 많은 특징을 가지고 있다. 달력, 주, 일력이 있다. 또한, 뒤로나 다음 버튼을 사용하여 오늘이나 다른 날로 쉽게 이동할 수 있다. 달력의 날짜 범위를 끌어 날짜 범위를 선택할 수도 있다. 그것으로 날짜로 원하는 조작을 할 수 있다.
우리는 백엔드에 있는 데이터를 JSON 파일로 저장할 것이다.
우리는 리액션을 사용하여 앱을 만들 것이다. 시작하려면 다음을 실행하십시오.
npx create-react-app calendar-app
to create the project.
Next, we have to install a few packages. We will use Axios for HTTP requests to our back end, Bootstrap for styling, MobX for simple state management, React Big Calendar for our calendar component, React Datepicker for the date and time picker in our form, and React Router for routing.
To install them, we run:
프로젝트를 만들기 위해.
다음으로, 우리는 몇 개의 패키지를 설치해야 한다. 백엔드에 대한 HTTP 요청에는 Axios, 스타일링에는 Bootstrap, 단순 상태 관리에는 MobX, 캘린더 구성요소에 대한 React Big Calendar, 양식의 날짜 및 시간 선택기에는 React Datepicker, 라우팅에는 Ract Router를 사용할 것이다.
설치하기 위해 다음을 실행한다.
npm i axios bootstrap mobx mobx-react moment react-big-calendar react-bootstrap react-datepicker react-router-dom
With all the packages installed, we can start writing the code. First, we replace the existing code in App.js with:
모든 패키지를 설치하면, 우리는 코드를 쓰기 시작할 수 있다. 첫째, App.js의 기존 코드를 다음 코드로 대체한다.
import React from "react";
import { Router, Route } from "react-router-dom";
import HomePage from "./HomePage";
import { createBrowserHistory as createHistory } from "history";
import Navbar from "react-bootstrap/Navbar";
import Nav from "react-bootstrap/Nav";
import "./App.css";
import "react-big-calendar/lib/css/react-big-calendar.css";
import "react-datepicker/dist/react-datepicker.css";
const history = createHistory();
function App({ calendarStore }) {
  return (
    <div>
      <Router history={history}>
        <Navbar bg="primary" expand="lg" variant="dark">
          <Navbar.Brand href="#home">Calendar App</Navbar.Brand>
          <Navbar.Toggle aria-controls="basic-navbar-nav" />
          <Navbar.Collapse id="basic-navbar-nav">
            <Nav className="mr-auto">
              <Nav.Link href="/">Home</Nav.Link>
            </Nav>
          </Navbar.Collapse>
        </Navbar>
        <Route
          path="/"
          exact
          component={props => (
            <HomePage {...props} calendarStore={calendarStore} />
          )}
        />
      </Router>
    </div>
  );
}
export default App;
We add the React Bootstrap top bar in here with a link to the home page. Also, we add the route for the home page in here with the MobX calendarStore passed in.
Also, we import the styles for the date picker and calendar here so that we can use them throughout the app.
Next in App.css , replace the existing code with:
여기에 홈 페이지에 대한 링크가 있는 React Bootstrap 상단 막대를 추가한다. 또한 MobX calendarStore가 전달된 여기에 홈 페이지 루트를 추가한다.
또한 달력 보기와 달력 스타일을 앱 전체에서 사용할 수 있도록 여기에 가져오기도 한다.
App.css 에서 기존 코드를 다음으로 교체:
.page {
  padding: 20px;
}
.form-control.react-datepicker-ignore-onclickoutside,
.react-datepicker-wrapper {
  width: 465px !important;
}
.react-datepicker__current-month,
.react-datepicker-time__header,
.react-datepicker-year-header,
.react-datepicker__day-name,
.react-datepicker__day,
[class^="react-datepicker__day--*"],
.react-datepicker__time-list-item {
  font-family: -apple-system, BlinkMacSystemFont, "Segoe UI", "Roboto", "Oxygen", "Ubuntu", "Cantarell", "Fira Sans",
    "Droid Sans", "Helvetica Neue", sans-serif;
}
to add some padding to our page, change the width of the date picker input and change the font of the date picker.
Next, create a file called CalendarForm.js in the src folder and add:
페이지에 패딩을 추가하려면 달력 보기 입력의 너비를 변경하고 달력 보기 글꼴을 변경하십시오.
그런 다음 src 폴더에 CalendarForm.js라는 파일을 만들고 다음을 추가하십시오.
import React from "react";
import Form from "react-bootstrap/Form";
import Col from "react-bootstrap/Col";
import DatePicker from "react-datepicker";
import Button from "react-bootstrap/Button";
import {
  addCalendar,
  editCalendar,
  getCalendar,
  deleteCalendar
} from "./requests";
import { observer } from "mobx-react";
const buttonStyle = { marginRight: 10 };
function CalendarForm({ calendarStore, calendarEvent, onCancel, edit }) {
  const [start, setStart] = React.useState(null);
  const [end, setEnd] = React.useState(null);
  const [title, setTitle] = React.useState("");
  const [id, setId] = React.useState(null);
React.useEffect(() => {
    setTitle(calendarEvent.title);
    setStart(calendarEvent.start);
    setEnd(calendarEvent.end);
    setId(calendarEvent.id);
  }, [
    calendarEvent.title,
    calendarEvent.start,
    calendarEvent.end,
    calendarEvent.id
  ]);
const handleSubmit = async ev => {
    ev.preventDefault();
    if (!title || !start || !end) {
      return;
    }
if (+start > +end) {
      alert("Start date must be earlier than end date");
      return;
    }
    const data = { id, title, start, end };
    if (!edit) {
      await addCalendar(data);
    } else {
      await editCalendar(data);
    }
    const response = await getCalendar();
    const evs = response.data.map(d => {
      return {
        ...d,
        start: new Date(d.start),
        end: new Date(d.end)
      };
    });
    calendarStore.setCalendarEvents(evs);
    onCancel();
  };
  const handleStartChange = date => setStart(date);
  const handleEndChange = date => setEnd(date);
  const handleTitleChange = ev => setTitle(ev.target.value);
const deleteCalendarEvent = async () => {
    await deleteCalendar(calendarEvent.id);
    const response = await getCalendar();
    const evs = response.data.map(d => {
      return {
        ...d,
        start: new Date(d.start),
        end: new Date(d.end)
      };
    });
    calendarStore.setCalendarEvents(evs);
    onCancel();
  };
return (
    <Form noValidate onSubmit={handleSubmit}>
      <Form.Row>
        <Form.Group as={Col} md="12" controlId="title">
          <Form.Label>Title</Form.Label>
          <Form.Control
            type="text"
            name="title"
            placeholder="Title"
            value={title || ""}
            onChange={handleTitleChange}
            isInvalid={!title}
          />
          <Form.Control.Feedback type="invalid">{!title}</Form.Control.Feedback>
        </Form.Group>
      </Form.Row>
<Form.Row>
        <Form.Group as={Col} md="12" controlId="start">
          <Form.Label>Start</Form.Label>
          <br />
          <DatePicker
            showTimeSelect
            className="form-control"
            selected={start}
            onChange={handleStartChange}
          />
        </Form.Group>
      </Form.Row>
<Form.Row>
        <Form.Group as={Col} md="12" controlId="end">
          <Form.Label>End</Form.Label>
          <br />
          <DatePicker
            showTimeSelect
            className="form-control"
            selected={end}
            onChange={handleEndChange}
          />
        </Form.Group>
      </Form.Row>
      <Button type="submit" style={buttonStyle}>
        Save
      </Button>
      <Button type="button" style={buttonStyle} onClick={deleteCalendarEvent}>
        Delete
      </Button>
      <Button type="button" onClick={onCancel}>
        Cancel
      </Button>
    </Form>
  );
}
export default observer(CalendarForm);
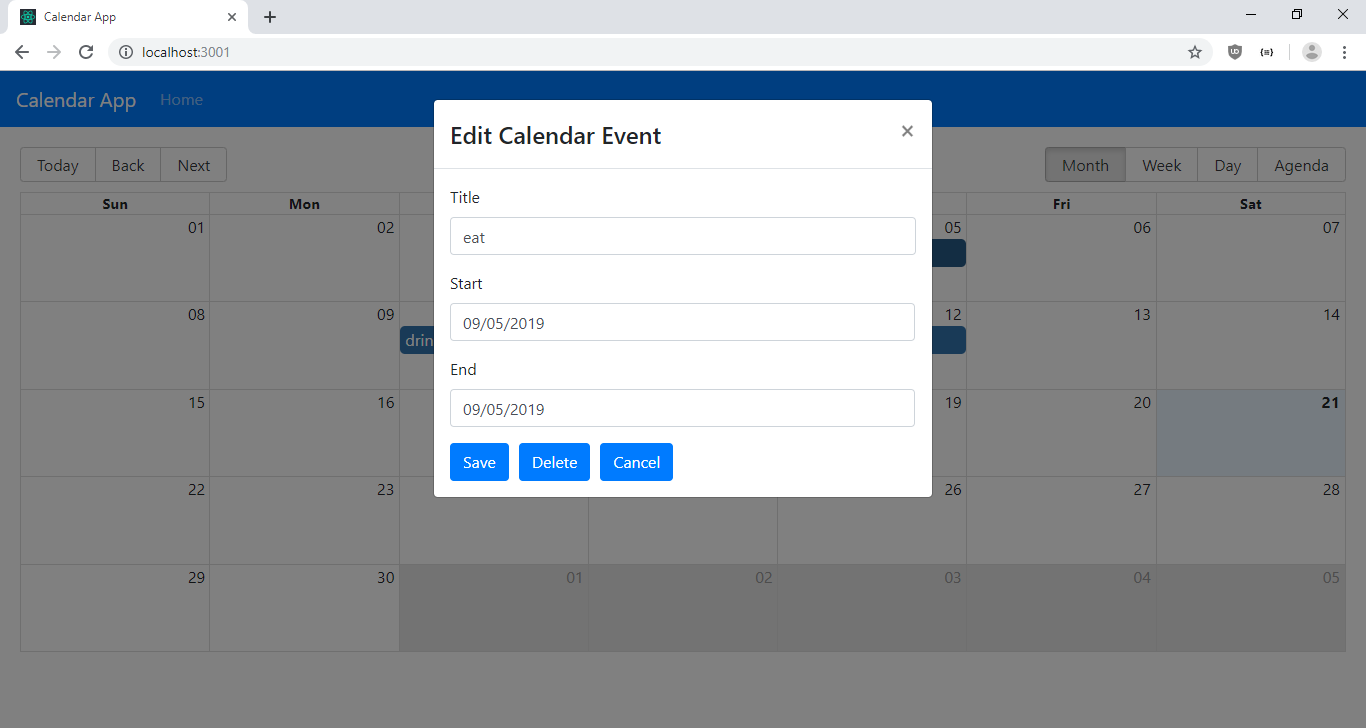
This is the form for adding and editing the calendar entries. We add the React Bootstrap form here by adding the Form component. The Form.Control is also from the same library. We use it for the title text input.
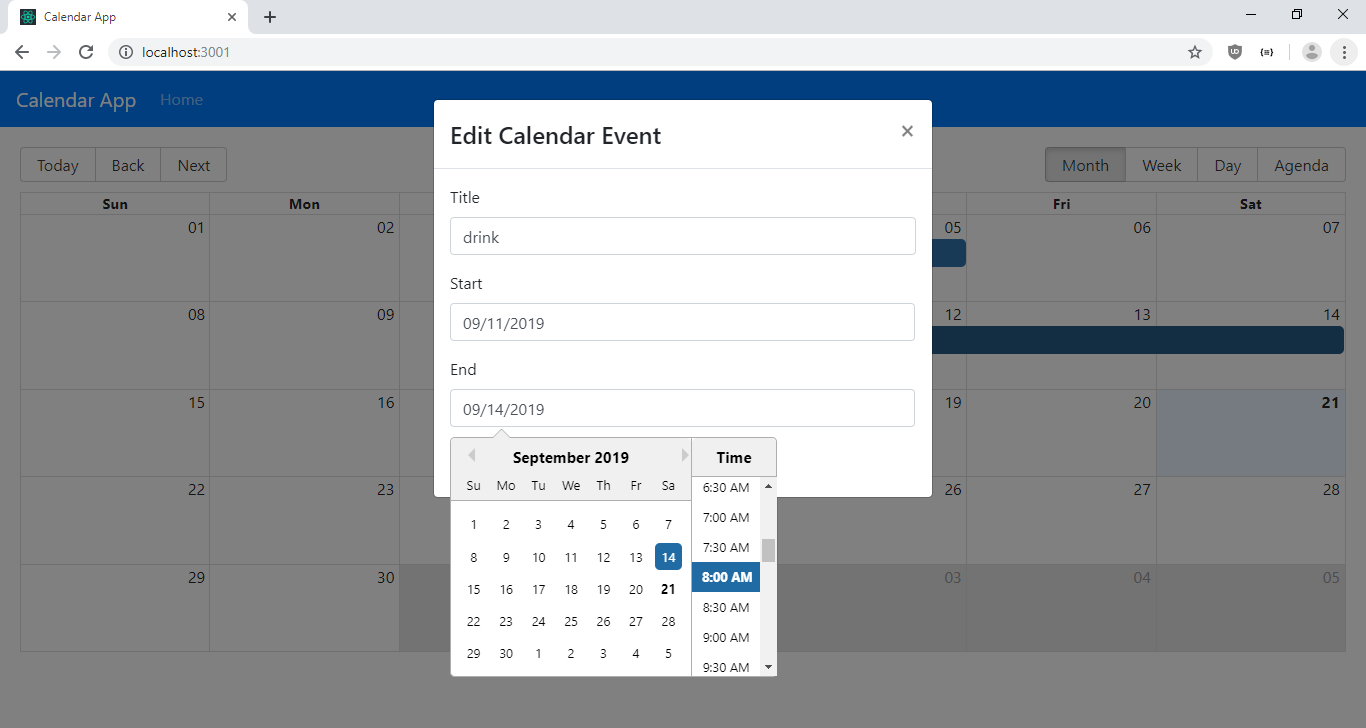
The other 2 fields are the start and end dates. We use React Datepicker in here to let users select the start and end dates of a calendar entry. In addition, we enable the time picker to let users pick the time.
There are change handlers in each field to update the values in the state so users can see what they entered and let them submit the data later. The change handlers are handleStartChange , handleEndChange and handleTitleChange . We set the states with the setter functions generated by the useState hooks.
We use the useEffect callback to set the fields in the calendarEvent prop to the states. We pass all the fields we want to set to the array in the second argument of the useEffect function so that the states will be updated whenever the latest value of the calendarEvent prop is passed in.
In the handleSubmit function, which is called when the form Save button is clicked. we have to call ev.preventDefault so that we can use Ajax to submit our form data.
If data validation passes, then we submit the data and get the latest and store them in our calendarStore MobX store.
We wrap observer outside the CalendarForm component so that we always get the latest values from calendarStore .
Next, we create our home page. Create a HomePage.js file in the src folder and add:
이것은 일정관리 항목을 추가 및 편집하기 위한 양식이다. 여기에 Form 구성 요소를 추가하여 React Bootstrap 양식을 추가하십시오. 양식.통제도 같은 도서관에서 한다. 우리는 그것을 제목 문자 입력에 사용한다.
나머지 2개 필드는 시작일과 종료일이다. 여기서는 사용자가 일정관리 항목의 시작 날짜와 종료 날짜를 선택할 수 있도록 날짜 선택기(react Datepicker(반응 날짜 선택기) 또한 사용자가 시간을 선택할 수 있도록 시간 선택기를 활성화한다.
각 필드에는 상태 값을 업데이트하는 변경 처리기가 있어 사용자가 입력한 내용을 확인하고 나중에 데이터를 제출할 수 있도록 한다. 변경 핸들러는 handleStartChange , handleEndChange 및 handleTitleChange 입니다. 우리는 useState 후크에 의해 생성된 세터 기능으로 상태를 설정한다.
useEffect 콜백을 사용하여 calendarEvent 소포의 필드를 상태로 설정하십시오. useEffect 함수의 두 번째 인수에 설정하려는 모든 필드를 배열로 전달하여 calendarEvent prop의 최신 값이 전달될 때마다 상태가 업데이트되도록 한다.
handleSubmit 함수에서 Save(저장) 버튼을 클릭하면 호출된다. av.preventDefault를 호출해야 Ajax를 사용하여 양식 데이터를 제출할 수 있다.
데이터 유효성 검사가 통과되면 데이터를 제출하고 최신 정보를 받아 CalendarStore MobX 스토어에 저장하십시오.
항상 calendarStore에서 최신 값을 얻을 수 있도록 CalendarForm 구성 요소 외부에 관찰자를 배치한다.
다음으로, 우리는 홈페이지를 만든다. src 폴더에 HomePage.js 파일을 만들고 다음을 추가하십시오.
import React from "react";
import { Calendar, momentLocalizer } from "react-big-calendar";
import moment from "moment";
import Modal from "react-bootstrap/Modal";
import CalendarForm from "./CalendarForm";
import { observer } from "mobx-react";
import { getCalendar } from "./requests";
const localizer = momentLocalizer(moment);
function HomePage({ calendarStore }) {
  const [showAddModal, setShowAddModal] = React.useState(false);
  const [showEditModal, setShowEditModal] = React.useState(false);
  const [calendarEvent, setCalendarEvent] = React.useState({});
  const [initialized, setInitialized] = React.useState(false);
const hideModals = () => {
    setShowAddModal(false);
    setShowEditModal(false);
  };
const getCalendarEvents = async () => {
    const response = await getCalendar();
    const evs = response.data.map(d => {
      return {
        ...d,
        start: new Date(d.start),
        end: new Date(d.end)
      };
    });
    calendarStore.setCalendarEvents(evs);
    setInitialized(true);
  };
const handleSelect = (event, e) => {
    const { start, end } = event;
    const data = { title: "", start, end, allDay: false };
    setShowAddModal(true);
    setShowEditModal(false);
    setCalendarEvent(data);
  };
const handleSelectEvent = (event, e) => {
    setShowAddModal(false);
    setShowEditModal(true);
    let { id, title, start, end, allDay } = event;
    start = new Date(start);
    end = new Date(end);
    const data = { id, title, start, end, allDay };
    setCalendarEvent(data);
  };
React.useEffect(() => {
    if (!initialized) {
      getCalendarEvents();
    }
  });
return (
    <div className="page">
      <Modal show={showAddModal} onHide={hideModals}>
        <Modal.Header closeButton>
          <Modal.Title>Add Calendar Event</Modal.Title>
        </Modal.Header>
<Modal.Body>
          <CalendarForm
            calendarStore={calendarStore}
            calendarEvent={calendarEvent}
            onCancel={hideModals.bind(this)}
            edit={false}
          />
        </Modal.Body>
      </Modal>
<Modal show={showEditModal} onHide={hideModals}>
        <Modal.Header closeButton>
          <Modal.Title>Edit Calendar Event</Modal.Title>
        </Modal.Header>
<Modal.Body>
          <CalendarForm
            calendarStore={calendarStore}
            calendarEvent={calendarEvent}
            onCancel={hideModals.bind(this)}
            edit={true}
          />
        </Modal.Body>
      </Modal>
      <Calendar
        localizer={localizer}
        events={calendarStore.calendarEvents}
        startAccessor="start"
        endAccessor="end"
        selectable={true}
        style={{ height: "70vh" }}
        onSelectSlot={handleSelect}
        onSelectEvent={handleSelectEvent}
      />
    </div>
  );
}
export default observer(HomePage);
We get the calendar entries and populate them in the calendar here. The entries are retrieved from the back end and then saved into the store. In the useEffect callback, we set to get the items when the page loads. We only do it when initialized is false so we won’t be reloading the data every time the page renders.
To open the modal for adding calendar entries, we set the onSelectSlot prop with our handler so that we can call setShowAddModal and setCalendarEvent to set open the modal and set the dates before opening the add calendar event modal.
Similarly, we set the onSelectEvent modal with the handleSelectEvent handler function so that we open the edit modal and set the calendar event data of the existing entry.
Each Modal have the CalendarForm component inside. We pass in the function for closing the modals into the form so that we can close them from the form. Also, we pass in the calendarStore and calendarEvent so that they can be manipulated in the CalendarForm.
We wrap observer outside the CalendarForm component so that we always get the latest values from calendarStore .
Next in index.js , we replace the existing code with:
우리는 캘린더 항목을 받아서 캘린더에 기입한다. 항목은 백 엔드에서 검색된 후 저장소에 저장된다. useEffect 콜백에서는 페이지가 로드될 때 항목을 가져오도록 설정했다. 초기화가 잘못된 경우에만 실행하므로 페이지가 렌더링될 때마다 데이터를 다시 로드하지 마십시오.
캘린더 항목을 추가하기 위한 모달을 열기 위해, 우리는 setShowAddModal 및 setCalendarEvent를 호출하여 모달 열기를 설정하고 캘린더 추가 이벤트 모달을 열기 전에 날짜를 설정할 수 있도록 핸들러와 함께 onSelectSlot 프로펠러를 설정하십시오.
마찬가지로, handleSelectEvent 핸들러 기능으로 onSelectEvent 모달도 설정하여 편집 모달을 열고 기존 항목의 캘린더 이벤트 데이터를 설정한다.
각 모달에는 내부에 CalendarForm 구성 요소가 있다. 우리는 모달들을 양식에서 닫을 수 있도록 닫는 기능을 양식에 전달한다. 또한 캘린더 양식에서 조정될 수 있도록 캘린더저장소 및 캘린더 이벤트를 전달한다.
항상 calendarStore에서 최신 값을 얻을 수 있도록 CalendarForm 구성 요소 외부에 관찰자를 배치한다.
다음 index.js에서는 기존 코드를 다음과 같이 대체한다.
import React from "react";
import ReactDOM from "react-dom";
import "./index.css";
import App from "./App";
import * as serviceWorker from "./serviceWorker";
import { CalendarStore } from "./store";
const calendarStore = new CalendarStore();
ReactDOM.render(
  <App calendarStore={calendarStore} />,
  document.getElementById("root")
);
// If you want your app to work offline and load faster, you can change
// unregister() to register() below. Note this comes with some pitfalls.
// Learn more about service workers: https://bit.ly/CRA-PWA
serviceWorker.unregister();
so that we can pass in the MobX calendarStore into the root App component.
Next, create a requests.js file in the src folder and add:
MobX calendarStore를 루트 앱 구성 요소로 전달할 수 있도록.
그런 다음 src 폴더에 requests.js 파일을 생성하고 다음을 추가하십시오.
const APIURL = "http://localhost:3000";
const axios = require("axios");
export const getCalendar = () => axios.get(`${APIURL}/calendar`);
export const addCalendar = data => axios.post(`${APIURL}/calendar`, data);
export const editCalendar = data =>
  axios.put(`${APIURL}/calendar/${data.id}`, data);
export const deleteCalendar = id => axios.delete(`${APIURL}/calendar/${id}`);
These are the functions for making the HTTP calls to manipulate the calendar entries.
Next, create store.js in the src folder and add:
일정관리 항목을 조작하기 위해 HTTP 호출을 수행하는 기능이다.
다음으로 src 폴더에서 store.js를 생성하고 다음을 추가하십시오.
import { observable, action, decorate } from "mobx";
class CalendarStore {
  calendarEvents = [];
setCalendarEvents(calendarEvents) {
    this.calendarEvents = calendarEvents;
  }
}
CalendarStore = decorate(CalendarStore, {
  calendarEvents: observable,
  setCalendarEvents: action
});
export { CalendarStore };
to save the items in the store for access by all of our components.
Next in index.html , replace the existing code with:
모든 구성 요소가 액세스할 수 있도록 저장소에 항목을 저장하십시오.
다음 index.html 에서 기존 코드를 다음으로 교체하십시오.
<!DOCTYPE html>
<html lang="en">
  <head>
    <meta charset="utf-8" />
    <link rel="shortcut icon" href="%PUBLIC_URL%/favicon.ico" />
    <meta name="viewport" content="width=device-width, initial-scale=1" />
    <meta name="theme-color" content="#000000" />
    <meta
      name="description"
      content="Web site created using create-react-app"
    />
    <link rel="apple-touch-icon" href="logo192.png" />
    <!--
      manifest.json provides metadata used when your web app is installed on a
      user's mobile device or desktop. See https://developers.google.com/web/fundamentals/web-app-manifest/
    -->
    <link rel="manifest" href="%PUBLIC_URL%/manifest.json" />
    <!--
      Notice the use of %PUBLIC_URL% in the tags above.
      It will be replaced with the URL of the `public` folder during the build.
      Only files inside the `public` folder can be referenced from the HTML.
Unlike "/favicon.ico" or "favicon.ico", "%PUBLIC_URL%/favicon.ico" will
      work correctly both with client-side routing and a non-root public URL.
      Learn how to configure a non-root public URL by running `npm run build`.
    -->
    <title>Calendar App</title>
    <link
      rel="stylesheet"
      href="https://maxcdn.bootstrapcdn.com/bootstrap/4.3.1/css/bootstrap.min.css"
      integrity="sha384-ggOyR0iXCbMQv3Xipma34MD+dH/1fQ784/j6cY/iJTQUOhcWr7x9JvoRxT2MZw1T"
      crossorigin="anonymous"
    />
  </head>
  <body>
    <noscript>You need to enable JavaScript to run this app.</noscript>
    <div id="root"></div>
    <!--
      This HTML file is a template.
      If you open it directly in the browser, you will see an empty page.
You can add webfonts, meta tags, or analytics to this file.
      The build step will place the bundled scripts into the <body> tag.
To begin the development, run `npm start` or `yarn start`.
      To create a production bundle, use `npm run build` or `yarn build`.
    -->
  </body>
</html>
to add the Bootstrap CSS and rename the title.
Now all the hard work is done. All we have to do is use the JSON Server NPM package located at https://github.com/typicode/json-server for our back end.
Install it by running:
Bootstrap CSS를 추가하고 제목 이름을 변경하십시오.
이제 모든 힘든 일은 끝났다. 우리는 백엔드에 https://github.com/typicode/json-server에 있는 JSON 서버 NPM 패키지를 이용하기만 하면 된다.
다음을 실행하여 설치:
npm i -g json-server
Then run it by running:
그런 다음 다음을 실행하여 실행하십시오.
json-server --watch db.json
In db.json , replace the existing content with:
db.json 에서 기존 콘텐츠를 다음으로 대체하십시오.
{
  "calendar": []
}
Next, we run our app by running npm start in our app’s project folder and when the program asks you to run in a different port, select yes.
After that, you should see:
다음으로 앱의 프로젝트 폴더에서 npm start를 실행하여 앱을 실행하고 프로그램이 다른 포트에서 실행하도록 요청하면 yes를 선택하십시오.
그런 다음 다음을 확인하십시오.
'코딩코딩 > 과제 게시판만들기' 카테고리의 다른 글
| [mongoose]스키마의 다양한 속성 (0) | 2020.05.20 |
|---|